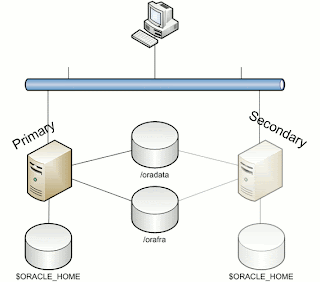
- 2 servers, not necessarily equal in specifications, but having identical Operating Systems
- Clustered File System (OCFS2 will suffice, even NFS will do the job)
What I have done to make this work is set up 2 OCFS2 File Systems, one under /oradata and one under /orafra.
Next, install the Oracle RDBMS software on both machines, each using the same location for the Oracle Home and installing identical copies.

Now we can prepare the secondary machine to serve as Failover server.
To do this, take the following steps:
1. Copy the server parameter file and bring it to the secondary machine under $ORACLE_HOME/dbs. Edit this file and make adjustments to the following parameters:
CONTROL_FILES = /orafra/SID
DB_FILE_RECOVERY_DEST = /oradata
DB_FILE_CREATE_DEST = /orafra
Optionally, you can create an spfile from this parameter file on the secondary machine.
2. Copy the /etc/oratab file to the secondary node
3. Create the necessary dump directories ($ORACLE_HOME/admin)
Now you are ready to go! Bring up your database on the primary machine and create a full backup as copy from your database:
allocate channel for maintenance type disk;
configure controlfile autobackup on;
configure default device type to disk;
run
{
RECOVER COPY OF DATABASE WITH TAG ‘IMG_COPY’ UNTIL TIME ‘SYSDATE – 1’;
BACKUP INCREMENTAL LEVEL 1 FOR RECOVER OF COPY WITH TAG ‘IMG_COPY’ DATABASE PLUS ARCHIVELOG DELETE INPUT;
copy current controlfile to ‘/orafra/
}
This script will do everything for you. See this post for an explanation of the script.
Now let's make some changes to the database and run the backup script again (NOTE: in order to have all changes you made to the database immediately reflected in the copy of your database, remove the UNTIL clause in the first line of the backup script).
What you can do now, is to simulate a crash of the database (there are a lot of ways to do this, I would recommend you just issue a shutdown abort at your first attempt).
Go to the second machine, log in as the oracle user, source your environment and perform the following steps to recover your database:
- start an rman session to the database (which is not started yet)
- mount the controlfile (located in /orafra/SID/controlfile, pointed to by the parameter file)
- issue "switch database to copy"
- issue "recover database"
- issue "alter database open resetlogs"
That is all it takes. Now your database is opened and available from the secondary machine. Now make sure that you reverse file locations in the backup scripts on the secondary machine to reflect the database file locations and the Flash Recovery Area. The database files should be located in /orafra, the flash recovery area should be located in /oradata. If you want to switch back, just use the backup script to create another backup as copy and switch back the way you did earlier. Make sure you have defined the correct file locations on the primary server, alike the secondary machine, to smoothen the switch.
Caveats
Like what is the case with any other regular backup, when you have made changes to the physical structure of your database (like adding datafiles, tablespaces, etc), an incremental backup needs to be taken immediately after, to prevent issues while recovering the database from the copy.
Another caveat is that it is necessary to have both database servers available in your tns alias being used to access the database. In such a case it is important to have load balancing set to off and failover set to on, having the primary as the first address.
Alternatives
If your server is still available, but the database has become corrupted, you can easily switch to the copy without the need for the secondary machine with a similar procedure as mentioned above. This way you will always have the choice of what to do.
Happy testing!


No comments:
Post a Comment